I think is it a bit too much to ask for request for the tool/workflow I'm going to explain, suggest so I thought it would be to comment on the coffee place to leave as suggestion-discussion, may be one day could jump into todo list :D
I commenta bit on the overall coloring I use but the discussion is about the solution discussed for the facades.
I've used several approaches that work nicely depending on the kind of object, hence semantic segmentation is a must, I do it manually for now. I've done about 10km mountain road manually, has been hell, hopefully 3dmasc can be trained to do this in the future given the ammount of data. The data is MMS scanner data.
back to the coloring, as I was saying each surface type has an approach that work better,
Vegetation:
This suggested approach works really really well.
https://www.cloudcompare.org/forum/view ... =19&t=6175
Still the scalar field approach would benefit from a bit of random color splats between two color values spread across the cloud. It would be great to have a scale parameter for the splat pattern aswell as some shapes to be defined such circles, squares and the blending between shappes, this would lay a not constant color base where merging the SF with the tree color scale, ressulting in a more natural vegetation coloring. Still the Tree color scale over Intensity SF does an epic job.
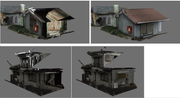
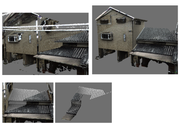
Facades
Facades have a lot of details in RGB that are impossible ( to me) to replicate by manually coloring. So I decided to somewhat use "textures" to fix the issues. The technique consistes on selecting a representative chunk of the data, same concept as a texture. Usually I choose an square chunk yet shape could be whatever. Then I duplicate and translate it to the area I whant to recolor. Ideally bigger than the area to be recolored, if else, duplicate, and transform positions to cover all the area, then merge all the color source chunks and finally color transfer to the area to be recolored.
I would like to propose an improvement of this technique. The idea would be
IDEAL WORKFLOW:
1) To face the facade in ortho view, perpendicularly (eyeballed), press "print screen" like button, so, a viewport is created, a plane in 3D space with the bounds of the visible area is created, the screen is captured(*1) and copied to memory.
2) user can copy paste the screen into 2D image editing package, fix all the errors, once done, copies the image.
3) user pastes the memory stored image into CC and is placed as a texture in the before created 3D plane.
4) 3D plane color are projected into the cloud using the stored viewport (*2)
(*1) The ideal rasterizing option would be to launch the rasterize windows where the "projection" dropdown was "current view", the major benefit of this would be the hability to capture higher resolutions than screen view.
(*2) May be the Plugin "Hidden point removal" could be used as base to work on the color projection instead of relying on PDAL projection.
(*2) May be a hack could be to to store z depth (z being in the normal of the plane axis)) so that the depth of each XY RGB can be transferred as point cloud.
Workflow options/variations:
Since the raster projection is not available in CC, even more complex at a given camera angle. I thin PDAL has a vixed top projection only. An simpler workflow would be.
1) User draw a plane with point snap defines 3 points and defines at which 3d axis where plane the plane will be drawn. May be a 1x1 plane is drawn.
2) User resizes the plane as needed, may be XY corner positions could be defined visually with handles. Doing that dynamically while bieng a ble to 3d move hte camera would be the most accurate and conveinent way.
3) Camera is positioned perpendicularly to the plane, user is able to zoom in-out and pan
4) screen is captured or rasterized.
5) 2D editing occurs.
6) Image is brought back and placed directly on the user defined 2D plane as texture. (may be add option to uv rotate +90 degrees on each click.
7) since de plane aligns nicely with the planar surface defined by the 3d points, color transfer is done by the user with the color "Interpolate from another entity" tool. User can move manually in the normal axis to recolor other elemnts thay may purtrude in the normal direction like the edge of a valcony.
Such tool would be epic for situations like: